
How to Create a Full Backup of your Windows 10?
All of us use a computer or a smartphone. Our devices hold a lot of personal and professional information. They are very important to us. But what happens when they get lost or stolen? Or when they break down permanently? You will be in a world of hurt. And that’s if you have a full backup of your device. If you don’t, then you will lose all of your data. This blog will teach you how to create a full backup of your device.
Nowadays, most people use three operating systems such as Windows and iOS on their devices. So if you want to protect your data then you have to create a full backup of your Windows computer. we are here to give you the full information on how to create a full backup of Windows and iOS on your devices.
How to Create your Windows Full Backup
Backing up may be as easy as copying a record from one spot to another from a difficult force to a detachable USB flash force, for example. But what you want for redundancy, security, and get entry to dictate what sort of backup you ought to use.
The data backup and recovery options in Windows 10 are numerous. A toolset that you may be familiar with from Windows 7 is the ability to create a complete system image backup. If Windows won’t boot, a system image can be used to recover files or restore your complete computer. It can also be used to access files in backups you might have made in Windows 7 or Windows 8.1.
Create a system image
Follow the steps to create the backup on windows 10:
- Firstly click on the windows icon.
- Click on the setting option on the bottom-left.

- Now select the Update & Security box. After that, you’ll see a new window on your computer screen.
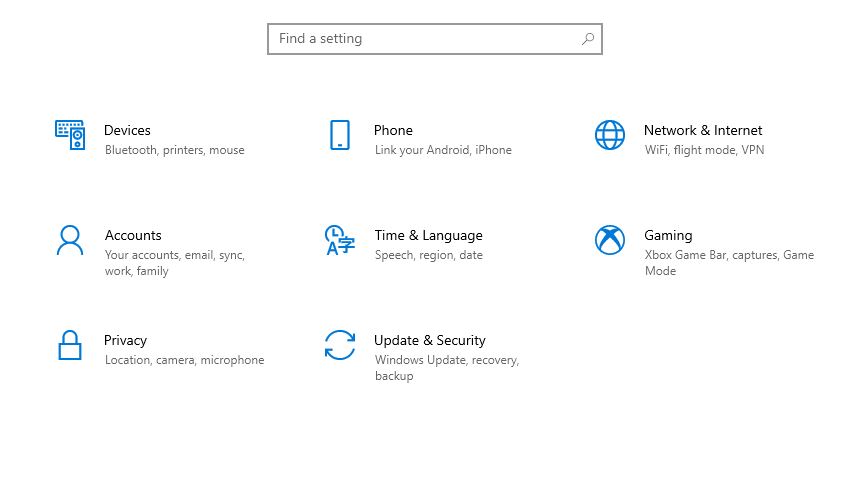
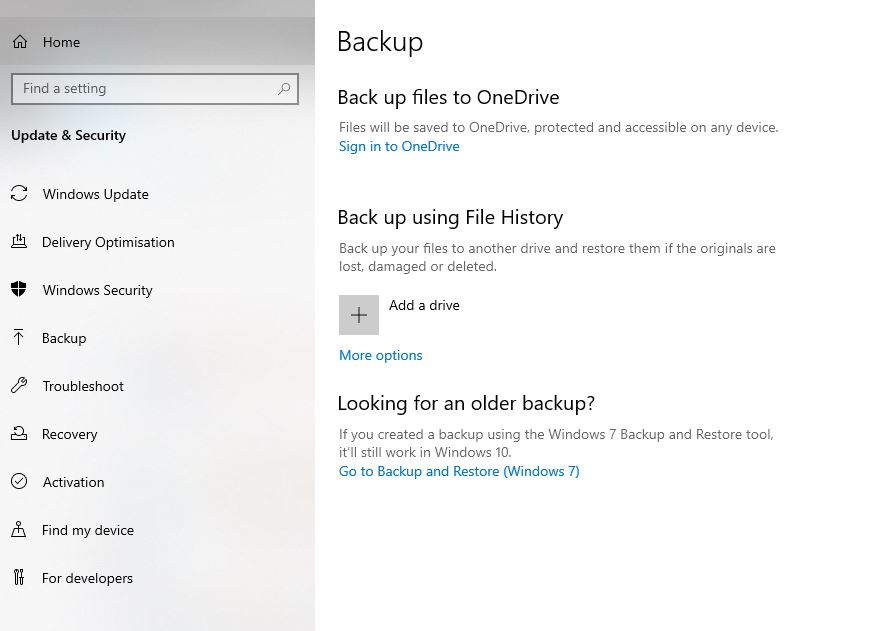
- Then click on the backup option on the left sidebar.
- Click on the Backup and Restore (Windows 7), but don’t worry—the backup part of this feature works just fine in Windows 10.
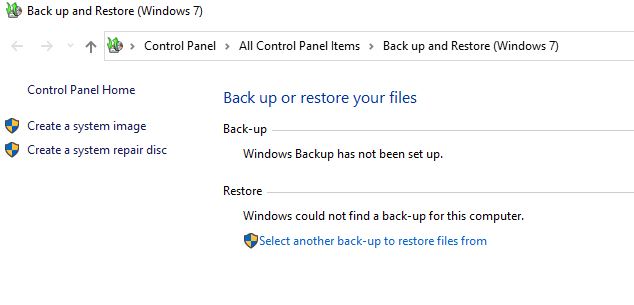
- Now you’ll see a new window, on this you have to click on the Create a system image found in the upper-left corner.
- Again a new window will open. At this screen, your window is looking for a backup destination on a hard drive or USB drive, DVD, or network location. You have to choose the backup locale you wish to use.
Note: if you have wished to select an external drive then make sure that it’s formatted using NTFS in order to store the image.
- After selecting the drive or backup destination you have to click on the Next button.
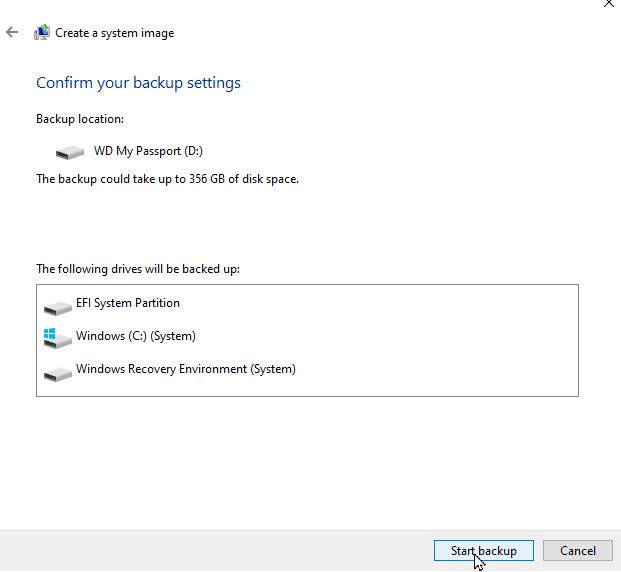
- In the last step, you just need to confirm which areas or partitions of your hard drive will be included in the image file. And after checking that you have to click on the Start Backup button. Now your window is creating the image files.
Create a System Repair Disc
If Windows is ever incapable of booting up on its own then you will want to create a system repair disc to use. For this process, you’ll have to need a DVD or CD Drive and if your computer doesn’t have one, you can always buy and connect an external DVD drive.
Follow the steps to create a system repair disc for backup on windows 10:
- Firstly, insert a DVD or CD into your drive.
- Click on the windows icon.
- Click on the setting option on the bottom-left.
- Now select the Update & Security box. After that, you’ll see a new window on your computer screen.
- Then click on the backup option on the left sidebar.
- Click on the Backup and Restore (Windows 7), but don’t worry—the backup part of this feature works just fine in Windows 10.
- Now you’ll see a new window, you have to click on the link at the upper left that reads Create a system repair disc at this Backup and Restore (Windows 7).
- After all this, you have to confirm that your DVD drive appears.
- In the last, click the Create disc button.
The backup will then start and may take time relying on how huge the installations are that you are backing up and the velocity of your drives. You can, however, preserve to apply the drives whilst it is happening, so experience loses to preserve to apply your machine as before.
If you probably did backup the force to an outside force, make certain to disconnect it as soon as the backup is whole and shop it someplace safe.
How to Restore a Backup on Windows 10
If you want to restore the backup then restoring the backup is no more complicated in comparison to making the backup in the first place. We hope you guys don’t need to restore a backup because your data remains safe and secure. But in case you’ve accidentally deleted your important data or you have a data failure and need to access that data urgently then it is not complicated. Nowadays, restoring the backup is a very task in Windows 10 or any other operating system.
Follow the steps to restore the backup on windows 10:
- Firstly, connect your external or internal drive which contains the system backup to your windows computer.
- Now restart your computer and boot your windows by repeatedly pressing the F8 key to access the troubleshooting menu.
- After that, click on the Troubleshoot option button.
- Then click on the Advanced options button.
- Select the System Image Recovery options button.
- Select the Windows 10 options button.
- Now you have to select the Use the latest available system image option button. And in case if you have multiple backups then select a system image instead of manually.
- Select Next.
- In the last, select Next followed by Finish.
Note: when you were restoring to a new drive. Then before continuing further, you should have to use the format and repartition disks option. To prevent your other disks, just be sure to Exclude disks from also being formatted in the process.
After finishing the last step the backup will begin to restore. It can take some time but it totally depends on the size of your backup and the speed of your system and drives involved. Once complete, however, you have to be capable of booting on your newly restored gadget because it came before. If you run into problems, make certain to apply the gadget boot menu to verify you are booting to the perfect drive.
How to Create a Full Backup of macOS
Creating the full backup on macOS is also very simple. You can easily backup your data or any other important information on iCloud and you can also customize them. Follow the steps accordingly to create a full backup on macOS:
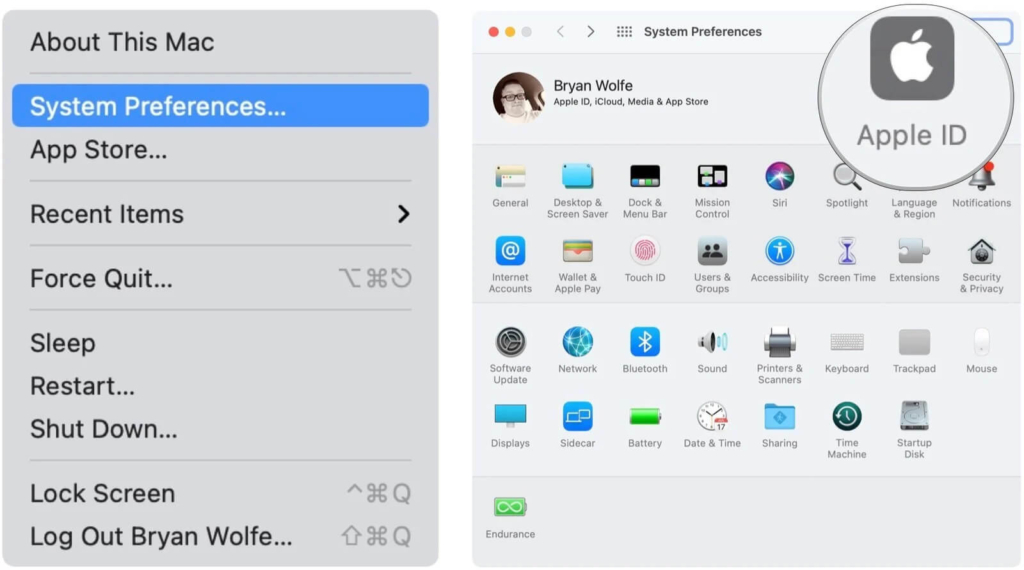
- Firstly, click on the Apple icon on your system screen top-left.
- Then click to open System Preferences.
- A new window will open and on the top-right, you’ll see Apple ID text with the apple icon. You have to click on this icon or Apple ID.
- After the iCloud menu button on the left sidebar menu if it isn’t already selected. Sign in to iCloud if prompted.
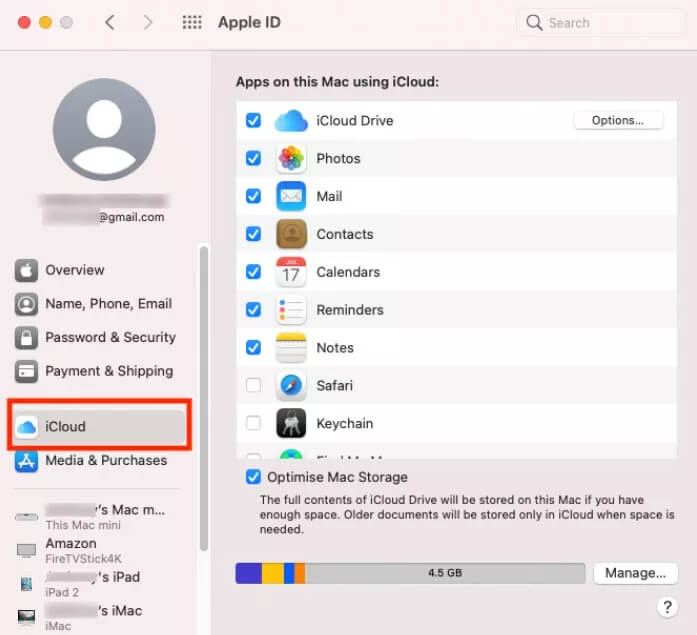
- Check whether the box next to iCloud Drive is checked or not. If it’s not already checked then check it then click on the Options button that is also next to iCloud Drive.
- Now you have to click on the check box for that you won’t create a backup or store it in your iCloud drives, such as your Documents, Desktop, Mail data, or other data. After all this click on the Done button that is highlighted in the blue color.
Note: Make sure that all your documents are stored in iCloud Drive and local drive. Because sometimes documents may only be stored in iCloud and not on your local drive. So always use an external hard drive to back up your data.
Conclusion
Data or any information that we have stored on our devices is very important for us. But what happens when they get lost or stolen? Or when they break down permanently? For protecting our data in our system, today we want to share a blog post with you about how to create a full backup of your device. There are several situations where you would want to do this. For example, if you want to sell or give your device to someone else, have a system failure, hard drive crash, and so on, you will need to create a backup of your device so that you can restore it to the new device.
We hope you enjoyed our new article post. As always, if you have any questions, feedback, or suggestions, please don’t hesitate to reach out to us! Thank you for reading, and have a great day!


