How to Record Your Screen in Windows 10?
To capture something which is being displayed on your screen, screenshots are the best option. But sometimes we need to create a more powerful message and in this case, quick how-to video suites perfectly. Windows 10 comes with a native video capture tool that will help you to record your screen it is primarily designed for gamers but it can also be used for any open application. It offers a very convenient way to record the screen and if you are willing to add audio you can do that also.
In this article, we have mentioned different steps on how to record your screen in Windows 10. You can even use these steps in Windows 11 also but the visuals in Windows 11 will look a bit different. So, let’s start with these different methods which include a step-by-step detail:
Use Xbox Game Bar
Xbox Game Bar is a new feature from Microsoft which can be used to record your window. It is one of the easiest ways to record your screen. This feature will only work on those PCs which will support an encoder. So, to use this feature, your PC needs to support any one of the following encoders. This article section will show you how to record your screen using Xbox Game Bar.
- AMD VCE
- Intel Quick Sync H.264
- Nvidia NVENC
Steps to Record Screen Using Xbox Game Bar
Step1: Click the Start button and open Setting. There is an alternate method also available for this to click the notifications icon on the taskbar and select “All Settings” to go to the setting menu.
Step 2: A new window will open, you just need to select the Gaming option.
Step 3: After that, the Xbox Game Bar section will start loading by default.
Step 4: Now you have to check, there will be a toggle button that should be set to “On”. You can find that button under the first paragraph. And, if that button shows “Off” then set it to “On”.
Step 5: Now, after this select Captures, which will be listed on the left to view. If needed, then adjust further options, they can be customized.
Under the Captures option, you can change the saving location for your recordings and screenshots, enable background recording, and enable recordings like where you want them to be saved even when your laptop isn’t plugged in. While you projecting, you will also get an option to record your screen, you can also set a maximum recording length, and adjust your audio settings and video quality settings according to your demand.
Step 6: After adjusting your settings, to open the Xbox Game Bar, type the default keyboard shortcut: Win + G.
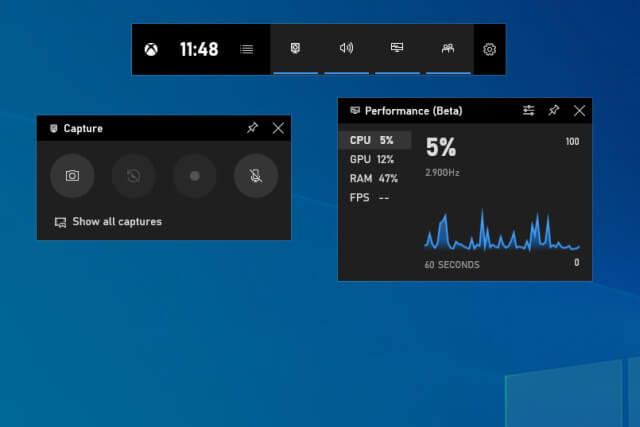
Step 7: Near your screen’s top-center edge, an Xbox Game Bar will appear. It provides buttons to access and change these overlays and settings:
- Widget Menu
- Audio
- Capture
- Performance
- Xbox Social
- Gallery
- Looking for Group
- Settings
The Capture overlay should appear by default in the Game Bar’s settings. If you have more than one display connected to your PC, like a three-monitor setup, then the Xbox Game Bar interface will appear on the screen where you last clicked.
Step 8: Now, to start the recording, click the round Start Recording button present on the Capture overlay and to stop the recording, click the purple Stop Recording button.
Use PowerPoint
This method is relatively easy to record your screen but the drawback is that for this to work you will need Microsoft’s desktop software and a subscription to Microsoft 365. This will also not work with the online-only version.
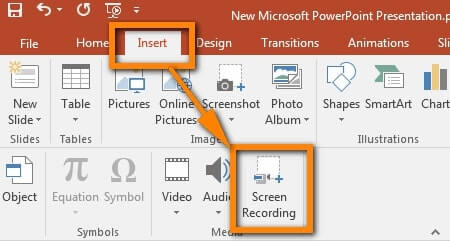
- Open a PowerPoint file and then from the menu bar click Insert.
- After that, you’ll see a button named Screen Recording located on the right side of the Media panel, you have to click on that button.
- On your screen’s top-center edge, a new toolbar will appear. After clicking the Select Area button, by using your mouse, draw a box around the area you want to record.
- Click the Record button or use the keyboard shortcut Windows + Shift + R keys simultaneously to start the recording.
- After this, you will have the option of the Pause button and Stop button on the screen and you can use them as per the requirements.
- After the recording part is over, you need to save the video. To save the recorded video, right-click on the video displayed within PowerPoint, and a pop-up menu will appear, select the Save Media As an option from the menu and save it to your desired place.
Use Chrome Operating System
This Chrome Screen Recorder is a free tool that allows you to record video from your computer screen and webcam at the same time. It is a great way to create software demos, tutorials, and training videos. In this article, we will go over how to record your screen using a Chrome Screen Recorder, as well as some of the best alternatives to this tool. Google Chrome operating system now offers a new native screen recording tool. Google keeps on updating its screen recording options with new capabilities from time to time.
- Log in to Chrome Browser.
- After that press Shift + Ctrl + the Show Windows button together.
- Now you’ll see a pop-up menu open on the window screen, you just need to click the button named Screen Capture.
- A new toolbar will appear at the bottom of the screen. A screen capture tool will appear to Record Partial Screen. Draw a box around the area on the area of the screen you want to capture by using a mouse button or touchpad. To Record Full Screen and Record Window facility is also available in the toolbar.
- In this process by default, the screen capture tool is set to Screenshot. You can change it according to you. Click the Screen Record button on the toolbar to capture the video.
- And then again click on the Record button.
- And when you want to stop the screen recording, you just need to click the Stop Screen Recording button which will be displayed next to the system clock to stop the recording. By default, these recorded videos will be saved to the Downloads folder as Screen recordings.
Use Chrome Extension Multiplatform
If the above-mentioned methods have not been a solution to your problem then you can go for this option, you can install a Chrome extension called Screencastify. Follow the steps mentioned below to install the chrome extension to start recording:
- Go to Chrome Web Store and open the Screencastify and click the Add to Chrome button, a pop-up menu will appear showing Add Extension, click it.
- Next to the address bar, a Screencastify icon will be located, select it. If you don’t see an icon near the address bar then you need to select the Extensions icon and pin the Screencastify icon by clicking on the pin icon.
- Now, the next thing you have to do is to sign in with your Google Account and create a Screencastify account.
- Now click the blue button labeled as Enable Mic and Webcam button, after a pop-up window will appear asking for Allow option, allow it.
- Click the Enable Tools button, and then click the Allow button in the pop-up window displayed just next to the action.
- Now again you need to select the Screencastify icon and then a new drop-down menu appears.
- You will be asked to select a source, you can select any from these: Browser Tab, Desktop, or Webcam Only.
- Now, enable the microphone and webcam if needed.
- If you want to add additional settings like a countdown timer, etc, click Show More Options.
- Now you are ready to record, click on the Record button to start recording. You are only limited to recording 5 minutes using the free account, if you want to do more you will need the subscription.
- .When you have done your recording, then to stop the recording you need to click the Screencastify icon again and then select the Stop button in the drop-down menu.
- The video will be now available to you to edit, share a copy, or download. These videos are saved to Google Drive by default.
Some Alternative offline apps for professional work
There are some alternate methods to record your screen. Some of them are paid and some are free. Here we will be discussing them, so let’s see some other methods:
OBS Studio (free)
OBS Studio is an open-source and one of the most advanced freely available screen-recording apps. This app has built-in streaming functions for those users who want a live audience while recording the screen.
OBS Studio is a fully-featured app, but it can take a little longer if you want to set up your personal preferences. But over of, it’s the best of the screen-recording apps that are currently available for free.
Snagit ($50+)
Snagit is a paid version to record your screen, it is mostly suitable for startups than gamers. It has a lot of recording features primarily for use in a workplace setting. These features of Snagit include a screen recorder, annotations for screenshots, templates, and the ability to create a video from a series of screenshots. As we have mentioned that it is a paid version, it cost $50 and you will be getting a lot of features that will be worth buying.
Conclusion
Recording your screen on your Windows PC can be a lot of fun. There are a lot of different reasons why you might want to record your screen including: Making a tutorial video for a project at work, recording a video of a video game, recording a VR experience, recording a video call, and of course, recording a video for a blog! No matter what you’re recording a screen for, Windows 10 makes it incredibly easy to do so. In this blog post, we have discussed with you how to record your screen in Windows 10.
We hope you enjoyed our blog post about how to record your screen in Windows 10. As always, if you have any questions, feedback, or suggestions, please don’t hesitate to reach out to us! Thank you for reading, and have a great day!