How to Change DNS Settings on your Windows 10 & Mac
An Internet user and a browser are the interpretation of a domain name system (DNS). To change the domain name into a numeric or an alphanumeric format, which is easier to load an Internet connection. The numeric/alphanumeric format is called by the IP address. Does the question arise about how to change DNS settings?

The loaded content on a website helps the browser. The IP address is unique for each network connection. While the DNS changes the domain name to an IP address, will the browser load the content in the webpage, as provided by the Internet?
It is recommended that a computer user change his / her DNS for various reasons, including protection against threats that you cannot see and internet speed. There is third-party software that can change the DNS address of your network. But it is becoming extra-precautionary, not having to rely on any other software, and knowing how to do it.
What is DNS?
DNS (Domain Name System) is the internet’s equivalent of a phone directory. When you wish to go to a website, you normally type in the domain name, such as google.com. A DNS will transform that into an IP address that your web browser will recognize.
A string of characters separated by periods and commas makes up an IP address. For example, one of Google.com’s IP addresses is http://173.194.203.106/. These days, though, a DNS address is only one part of the puzzle. As a result, you will no longer be able to visit a website using its IP address.
A default DNS will be assigned to you by your internet service provider. On a Mac or Windows 10 PC, though, you can always update your DNS settings.
Why change your DNS servers?
DNS servers can fall prey to hackers, trying to convert their DNS servers into one of their choices. As a result, your browser can direct you to websites that can breach your virtual privacy. When these attacks occur, your antivirus software may not be of use. Changing your DNS address can protect your IP address.
Adjusting your DNS settings to a public DNS server can increase your Internet speed five times faster than your normal Internet bandwidth.
Modifying DNS can also prevent your child from entering inappropriate websites. It helps to manage parental control.
Changing Your DNS on Your Windows 10 PC and Mac
Since Windows 10 and iOS operating systems differ from each other in many ways, the ways to change DNS settings through these user interfaces also vary. There are three ways to modify DNS settings on a computer running Windows 10.
You can use the control panel, settings, and command the prompt application to change DNS settings. While there is only one way to change DNS on a Mac. Here’s how you change DNS settings on your Windows 10 & Mac.
DNS address editing in Windows 10
Change DNS settings using the control panel
One can use the tool in the control panel in Windows OS, to edit the DNS address of their network. To modify DNS using the control panel, follow these steps:
- Open your control panel.
- In the Network and Internet category, select Network and Sharing Center. The ‘adapter’ here refers to the network adapter, which brings the Internet to you.
- On the left side, you will see some menus. Click the Change Adapter Settings menu.
- Select the network that provides Internet service to the user’s computer and choose Properties.
- Click the Internet Protocol version 4 (TCP / IPv4) check box.
- In the same window, click on the Properties menu.
- Under the General tab in the Internet Protocol version 4 (TCP / IPv4) Properties window, you will see that you can change the IP address and DNS server. Use the following DNS server address to check and type in the DNS server you want to use.
- Enter your preferred DNS server and click OK. Select the pass when the work is completed.
Editing Windows 10 DNS Settings Using Settings
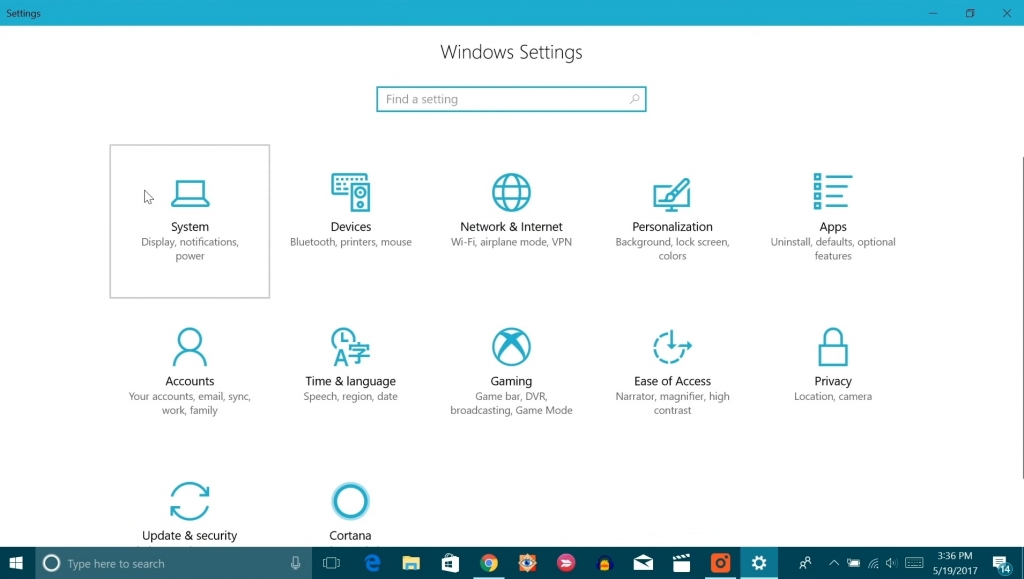
The user can also edit network settings through Windows Settings in Windows 10 OS. This is the simplest way to edit your network DNS in a Windows 10 operating system.
- When you open the start button, you will be able to see the settings on the left side. Click on it.
- Select the Network and Internet menu and in it, click on Ethernet or Wi-Fi, based on which your system gets access to the Internet. Select Connected Network.
- In the IP Settings category, click the Edit button.
- In the Edit IP Settings drop menu, select Manual.
- The IPv4 (Internet Protocol version 4) switch must be turned on. Click on the switch.
- Enter the primary and secondary DNS server addresses.
- After typing in the new address, click Save to save the changes.
Windows 10 DNS address editing with command prompt
A line of command in the right place can also change your network’s DNS settings. This is made possible with a command prompt in Windows. Here’s how you can change your DNS in Windows 10 in the most complicated way:
- In the blank space next to netsh, type interface. Hit the enter key.
- Address = “1.1.1.1” This command sets the primary domain name server settings to 1.1.1.1
- To change the alternate DNS IP address, enter this command:
Interface IP DNS name = “your adapter” address = “1.0.0.1 2 index = 2
Once you tap on login, your operating system will work with the new DNS server address you entered. Make sure that the command you entered is spelled correctly.
You can use the following command to clear the DNS resolver cache before changing the DNS address: IPconfig / flush DNS.
Editing DNS server settings on a Mac
The user interface (UI) and function of an Apple Macintosh or MacBook are different from a Windows-based computer. Similar to changing Internet settings, one route to an Apple PC is different from Windows.
If you are using a Mac then how to change your DNS server:
- You will see an Apple logo on the top-left corner of your display. Click on it to see the menu dropdown.
- Click System Preferences.
- Select the network menu.
- Click Connected Network. The active network has a green dot. Disconnected people have a red dot on them.
- In the lower-right corner, there is an Advanced button. Click on it.
- You will see some tabs at the top of the window. From them, tap on the DNS tab.
- Tap the + sign under the DNS server column.
- Type in the DNS address you prefer and click OK.
- While you are changing the DNS address, tap Apply to save the changes.
Finding Your Alternate DNS
The most popular DNS servers are Cloudflare, Google Public, and Open DNS. Of these, Google and Cloudflare DNS are famous for their data speed and security. Google’s DNS is believed to provide the fastest network connection. These DNS servers are reliable and are safe for personal use.
You can use the following DNS, without worrying about privacy invasion or compromise
- Google DNS – 8.8.8.8 and 8.8.4.4
- Cloudflare DNS – 1.1.1.1 and 1.0.0.1
- Open DNS – 208.67.222.222 and 208.67.220.220
There are other DNS servers, which specify the services offered. For example, 1.1.1.1 with Wrap is a server that provides its services specifically for mobile phones and tablets. Comodo Secure (8.26.56.26) highlights providing safety against threats, phishing, and malware. There are even third-party applications that change DNS settings for you.
Wrapping Up!
With such a large number of DNS server addresses to keep you safe, you can stop worrying about losing your privacy to hackers, malware, and other threats that harm your computer via the Internet. You can protect terabytes of data from people who want to breach your computer to change DNS settings on your Windows 10 & Mac. If you are facing problems troubleshooting the above steps then contact our Technical Support Team. They will guide you step by step and solve your problems.