How to fix Microphone on Laptop when it is not working
Microphones are now inbuilt into laptops and it usually found bezels of the laptop screen near the webcam. It is an input device in a laptop and it is used to instruct the computer to perform specific tasks. There are many uses of microphones such as audio recording, gaming, streaming, and video calling. It is important to understand how to fix the microphone on a laptop in simple steps it will be useful for your work.
During the pandemic period, video calling or conferencing is become a part of life, for communication during video calls you need a microphone. More than half of the people are doing their important work on a video call. Companies are preferring meetings to be done on a video call. Schools are closed so students take their classes through video calls. If your microphone is not working so you are not able to communicate with others. Here we include some possible solutions it might be helpful to fix the microphone.
How to Fix Microphone on Laptop: 8 Solution
It doesn’t matter what kind of computer you have. suddenly if you are not able to hear a sound it will be frustrating. There could be a variety of reasons related to hardware and software problems. To fix the microphone issue you don’t need any special tools you can fix it by yourself with a few simple tips.
1. Allow access to the Microphone
First, you can do to enable microphone access in the app you’re using when your microphone is not working. You can follow these steps to check whether you allow access to the mic or not.
- On the search bar type and also press the Windows key then type microphone, and click on Microphone privacy settings.
- Now check the toggle is on that is under the Allow apps to access your microphone. If it is not on then slide it to on the side so you give access to the microphone.
- If you want to choose some specific apps you click on Choose which apps can access your microphone.

2. Check microphone isn’t muted
If your microphone is muted you can resolve this issue. Sometimes you pushed the button unknowingly when your laptop has a physically muted button. By pushing the button again you can resolve this issue. Otherwise, it will be muted by sound settings. To solve this follow these steps:
- Open Control Panel then click on Hardware and Sound.

- Now click on Sound, Select recording.

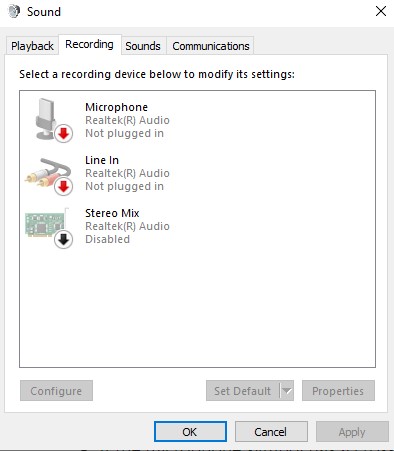
- After this you have to right-click on the microphone and go to properties, Now click level.

- If the microphone symbol has a crossed-out red circle next to it, click it to unmute it.
3. Set your Default Microphone Device
When you use your headset, you can be assured that the correct microphone is selected as the default. When you’ve already used another headset or microphone. Now the system gives two alternatives for connecting, and one of them is that it will connect to the microphone that you previously used. As a result, the default microphone is incorrect. You must follow these procedures to change your default microphones.
- Select Control Panel from the settings menu.
- After that, pick Sound from the Hardware and Sound menu.
- Click on Recording, select microphones, and then click the Set Default button to complete the process.
4. Run the Sound Troubleshooter
Troubleshooter detects and fixes crucial issues on your Windows device, ensuring that it runs properly. The sound troubleshooter will fix both recording and sound playback issues, as well as microphone issues. So run the troubleshooter and see if your microphone works.
- Type on the search bar Control Panel, and click on Troubleshooting.
- Select Hardware and Sound.
- Click on Recording and then click Next.
5. Update your audio driver
When your hard disc is old and malfunctioning, this is the most prevalent cause of trouble. It will also cause an issue for the microphone, as the microphone will no longer function properly. After installing a new driver or replacing an existing driver, make sure to restart your computer because the changes won’t take effect until then.
Steps to Update Audio Drivers
- Click on the keyboard key windows icon key and X simultaneously.
- Select Device Manager and now locate your audio device.
- Select properties by right-clicking on the audio device.
- Select the Driver tab in the pop-up window and click Update Driver.
6. Adjust Audio settings
When you plug in your microphone, Windows should recognize it and configure it as the default playback device. But sometimes it does not happen you have to manually select the default microphones and set their sound levels. When your windows recognize your microphones, you can edit some options to improve the performance of your microphone.
- On the taskbar, there is a sound icon on the right side of the corner click on that.
- Windows pop up now click on the recording.
- Click on the microphone device that you want to connect to and click on properties.
- Now click on the levels tab, and drag the microphone levels at the top.
- Click on the OK button.
7. Troubleshoot hardware issues
There may be a hardware issue as well, so look into it. To check for hardware faults, follow these instructions.
First, test the port by connecting your mics to another port; if this works, the port is likely defective. If that doesn’t work, move on to the next step.
Second step: Connect your microphone to another laptop and see if it works. If it does, there is a problem with your laptop. If your microphone still does not function, there is a microphone problem.
8. Check Physical connection
If your microphone isn’t working, make sure the physical connection between the microphone and the port is secure. It will function if the connection is loose and you have correctly plugged it in. If it still doesn’t work, remove the cable and re-plug it into the secure connection. Also, double-check that the cable is plugged into the correct audio jack. Labels are mentioned such as audio in. Mic input connectors are often pink, while output audio jacks are typically green.
Conclusion
In this article, we discussed how to fix microphone on laptop. We give you some solutions or tips to solve this problem such as making sure that you give access to the microphones, ensuring that the microphone is not muted, setting the default microphone device, running the troubleshooter, updating the audio driver, adjusting the audio settings, checking the physical connection and troubleshoot hardware issues.
If still, the microphone is not working then you might need to take your laptop to an expert after that for repair. Hopefully, one of these suggestions helped you resolve your Windows microphone problems.