How to stop automatic updates on Windows 10?
Nowadays most people are using pirated windows in their systems. These pirated windows mostly work the same as the official windows. After updating the windows the pirated windows will start showing problems. Mostly the pirated windows can’t adapt the updates. The new updates can slow down your pirated windows. So to overcome this problem, you guys can stop the updating of windows. In this blog, you guys will know about all kinds of updates in windows 10 or how to stop automatic updates in windows 10.
Before knowing how to stop the updates on windows 10, first, we will study how many types of updates are available in the system.
What are updates on Windows 10?
A replacement is a new, improved, or constant software program, which replaces older versions of the equal software program. For example, updating your running gadget brings it up to date with the modern drivers, gadget utilities, and protection software programs. Updates are regularly furnished through the software program writer freed from extra charge.
Windows 10 Update Control Using Services.msc
If you follow these below-mentioned steps you guys can control your window 10 updates. You can set it in both manual and automatic.
- First, you just need to open the “Run command window” by using “Win+R” or you can search run ” in your Windows 10 search box.

- After that in the run command window search the Services.msc.
- Now search the “Window Update” option in the list then after finding it double click on the Windows Update to access the General settings.

- Now, you’ll see a new window screen. On this screen, you have to click on the dropdown input box.
- After that, you’ll be able to see more options like automatic, manual, disable, and automatic delay. You have to select the disable option.
- Once done, click Ok and then restart your PC.
After you have completed these mentioned steps, your system will permanently disable Windows automatic updates. And if in case you want to enable the option again then follow the same steps as above and toggle the option to Automatic.
How to disable automatic updates with Group Policy
The Local Group Policy has policies to permanently disable automatic updates on Windows 10 pro. And you can also change the update setting on Windows 10 pro by deciding when patches should be installed on the computer.
Follow the steps to disable the updates permanently:-
- First, click on the start button on the screen.
- Now you have to search for the gpedit.msc and to launch the Local Group Policy Editor click the top result.
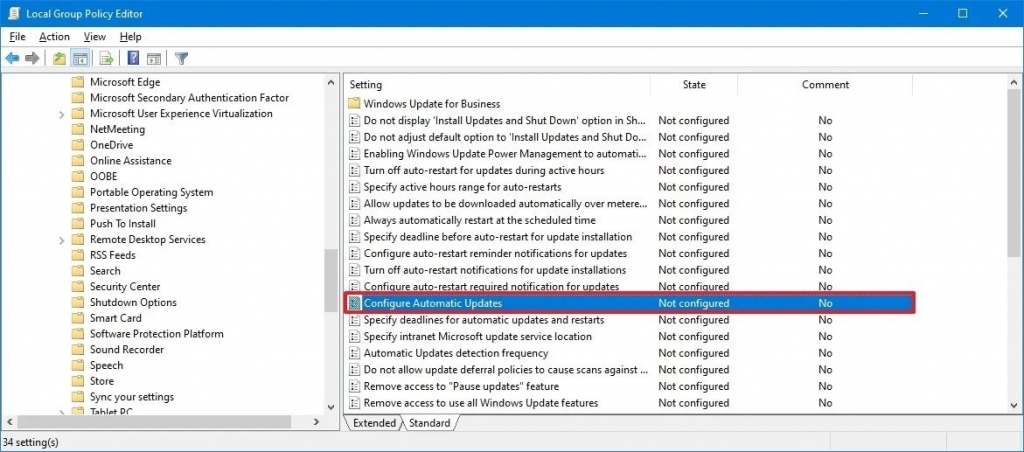
- If you are facing any problem in navigating then follow this navigate path:
Computer Configuration > Administrative Templates > Windows Components > Windows Update
- After that on the right side of the window lookout for the Configure Automatic Updates policy. When you see that double click on that.
- Now you’ll see a new window will open.
- In Windows 10 Pro, to turn off automatic updates permanently you just need to select the Disabled option.
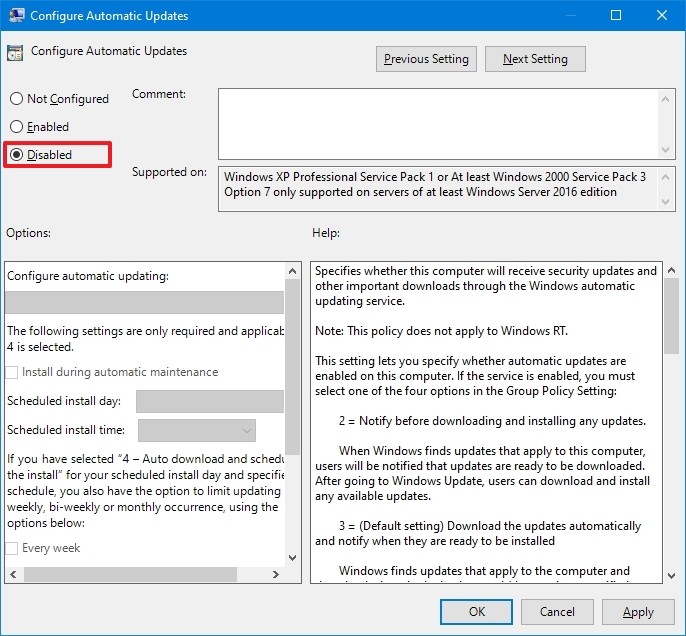
- After the first click on the Apply button.
- And in the last click the OK button.
The system will stop downloading updates automatically when you complete the above-mentioned steps. And in case you want to check the manual update then you can also check it in the settings this is still available. When you want to set your device to again enable automatic update then follow the all steps carefully and at step 6 select the Not Configured option.
Limit updates
Follow the steps to disable the updates permanently:-
- First, click on the start button on the screen.
- Now you have to search for the gpedit.msc and to launch the Local Group Policy Editor click the top result.
- If you are facing any problem in navigating then follow this navigate path:
Computer Configuration > Administrative Templates > Windows Components > Windows Update
- After that on the right side of the window lookout for the Configure Automatic Updates policy. When you see that double click on that.
- Now you’ll see a new window will open.
- In windows 10, you can prevent updates from downloading and installing automatically only just by selecting the option, under the “Options” section.
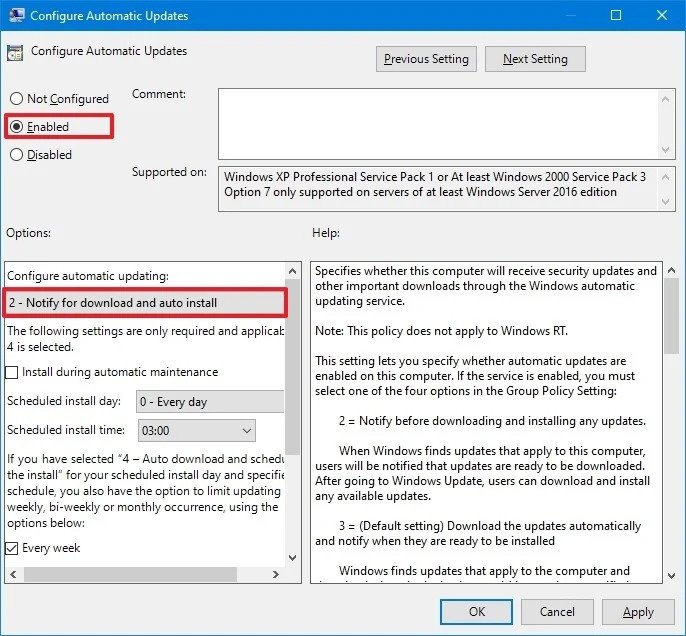
- After the first click on the Apply button.
- And in the last click the OK button.
If you want to choose the best option then select always 2 options that are notified for download and auto-install that is the best alternative. The system will stop downloading updates automatically when you complete the above-mentioned steps.
How to stop automatic updates by using Registry
Follow the steps below to use the registry to disable automatic Windows updates.
- There are two ways to access the Registry Editor: go to the search bar and type Registry Editor, or hit the keyboard keys simultaneously Windows key+R and type Regedit.
- You can use the key to see if your PC is ready to install Windows 10 after launching Registry Editor. Use the left-hand option and follow the instructions. HKEY LOCAL MACHINE>Software>Microsoft>Windows>CurrentVersion>WindowsUpdate>OSUpgrade.
- When you’ve found the right key, right-click it, select New, and then select DWORD (32-bit) Value from the submenu that appears.
- Now you have to add a new value, rename it AllowOSUpgrade, and double-click it to change the Value data to 0.
- Finally, close the Registry Editor and restart the system.
Set your connection as Metered to Stop Windows 10 Updates
This is another and simplest way to stop windows 10 updates. It might temporarily prevent your Windows 10 PC from updating. You just need to set your internet connection metered by this automatic updates will usually not take place.
Follow the steps to set your internet connection metered:-
- First, click on the window search bar and search Settings.
- Now click on the box name as Network & Internet.
- After you’ll see a sidebar at the left of the screen, from that sidebar you have to click on the Wi-Fi option button.
- The next step is to click on the Manage known networks.
- Now you’ll see a new page, from this you have to click on the connected wi-fi device.
- Then click on the Properties button.
- Again you’ll see a new window, in this window you have to toggle the Set as metered connection to On.
In this technique, other systems like OneDrive can also fail to update or backup information. So that is why this is not the perfect solution to stop the windows 10 updates. You can use this technique only for temporary purposes.
How to disable Windows 10 updates with the settings option?
This step is used to control the specific update in Windows 10. You don’t need to stop the whole window update for the specific update in Windows 10. Until the next Patch Tuesday arrives, you should pause updates. The setting app also gives you an option to stop system updates for up to 35 days on Windows 10 Home and Pro.
Follow the steps to disable updates with the settings:-
- First, click on the window search bar and search Settings.
- After that click on the box name Update & Security.
- Now you’ll see a sidebar on the left side and the sidebar shows an option name Window Updates.
- On the right side you’ll see the Advanced options button, click on that box.

- Now you see a new window and this is under the “Pause updates” section, by using the drop-down menu you can select how long to disable updates.
After you have completed these mentioned steps, your system will disable the Windows updates until the day you specified. And if in case you want to enable the option again then follow the same steps as above but on step No. 5, choose the Select date option. On the Windows Update page by clicking the Resume updates button you can accomplish the same effect.
How to Uninstall a Windows 10 Update?
In case your system has been updated by mistake or maybe you want the older version again in your system. So, you can also get the older version after updating windows 10 or in any other window. There are so many reasons that are why users want the older version in their system. So don’t worry about it by following these below steps you can get the older version or you can say that you can uninstall a windows 10 update.
Follow the steps to uninstall window 10 updates:-
- First, click on the window search bar and search Settings.
- After that click on the box name as Update & Security.
- Now you’ll see a sidebar on the left side and the sidebar shows an option name Window Updates.
- Next in the right menu list you’ll see, View Update History box. You need to click on this box.
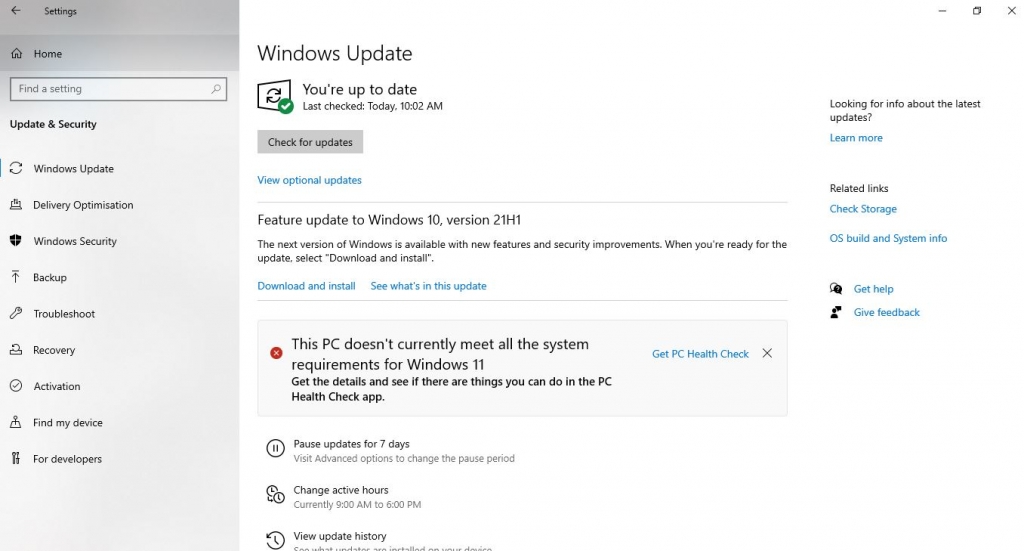
- The last step is to click on the Uninstall Updates.
- As your need, you can choose to uninstall the updates from here.
When you have completed these above-mentioned steps, you’ll see your updated version will be uninstalled and your older version of your windows 10 came back again.
Conclusion
Windows 10 is a great operating system and it has many features and improvements over its predecessors. One thing that has frustrated many users is the automatic updates that the system uses to download and install updates.
Many of us love to get new software, but we also want to control when and how we get updates and new features. In this blog, we surveyed different methods and discussed the pros and cons of each. Before we get into the tips and tricks, we want to mention that automatic updates provide important security and bug fixes. While we don’t recommend disabling automatic updates if you choose to do so, be sure to first read the following information about how to stop automatic updates on Windows 10.
If you still have any problems related to disable the updates or uninstall the windows 10 update. Then contact our Technical Support Team. They guide you step by step and assist you soon.
We hope you enjoyed our blog post about how to stop automatic updates on windows 10. As always, if you have any questions, feedback, or suggestions, please don’t hesitate to reach out to us! Thank you for reading, and have a great day!
